Showing posts with label hive. Show all posts

Saturday, April 20, 2019

2019-04-20: Hiving two packages of bees.

I had a couple of years with no bees.  First, I did not find out that they had died over the winter a couple of years ago until it was too late to order new bees.  Then, it sort of slipped my mind last spring.

So, this year, I ordered two packages from my usual supplier, Nature's Nectar.  I had one package each of Carniolan Honeybees and Italian Honeybees.  I did not really care which bees I got, but I usually do not get two of the same subspecies.

This was the first year that my packages were plastic.  I like the old wood and metal screen ones better, since I can see the bees easier.  I also would learn that it was easier to spray the bees with sugar water through the metal screen compared to the plastic packaging.

It was about a two-hour drive home, but the weather was mild; the bees probably did not get too hot.

I picked up the bees at 0915, but they suggest that you do not hive them until the evening.  So, they sat in the cool garage for most of the day.  I sprayed them with sugar water once to feed, calm, and cool them.

Finally, 1800 arrived, and we were ready to hive the bees.


I have the two packages of bees, and I'm wearing my bee suit.  If you watch other people's videos, they often don't wear a bee suit.  The reason is that the bees do not have a hive to protect, so they tend to be more docile.


Here I am with my helper, Vaughn.  I'm having some difficulty uploading the videos, so I'll outline the steps that we did:
  1. The syrup-soaked bees will be "poured" into the center of the bottom (and--at this time--only) hive body, so we removed the center four or so frames.
  2. Plug the entrance with the entrance reducer on the smallest setting and block that temporarily with a wad of prairie grass.
  3. Soak the bees well with syrup from the spray bottle.
  4. Use the hive tools to pry the metal can from the package.  (This is the syrup the bees ate during their trip from CA to MN and then from Stillwater to me.)
  5. Once the can is out, spray the bees some more.
  6. Remove the queen's cage (she is transported separately) and set it aside.
  7. Knock the bees to the bottom of their package by striking the package against the ground.
  8. Pour the syrup-soaked bees into the hive.
  9. Leave the mostly-empty package near the entrance so the bees can eventually get into there (the bees will probably push the grass out of the hole over the evening).
  10. Take the wood cork out of the queen's cage, and replace it with a mini-marshmallow.
  11. Put a pollen patty on the top of the frames for the bees to eat until they can bring in a good supply of pollen from plants.
  12. Put on the inner cover (the board with an oblong hole in it).
  13. Put the feeder pail over that hole so that the bees can feed from that until they are able to bring in nectar from flowers.
  14. Put an empty hive body over the pail.
  15. Put the outer cover over the empty hive body.
The next step, which we will probably do tomorrow, is to check the queen's cage.  Ideally, the marshmallow will have been eaten by the bees so that the queen can exit the cage and start laying eggs.

Saturday, September 6, 2014

Bees died over the winter of 2013 - 2014.

The 2013 - 2014 winter in Minnesota was a tough one for bees and certainly for my two hives; they both died.  In late December, we think that we saw evidence of cleansing flights, and I saw live bees in the hive when I looked through the top open hole.

But, come spring, both hives were dead.  When we opened each hive, we could see bees next to capped honey.  They died "head down" in the cell as if they were trying to get the last bit of honey out of the cell.  The mite counts were low going into the winter, and I saw no evidence of disease of infestation. So, it may be that the cold was just too much for the cluster of bees to move to new areas of honey.

In the spring/summer, we harvested the honey.  There wasn't a great deal of it, so we used the crush and strain method with a household stainless steel mesh strainer.  The harvest is below.

Honey from hives A and B (mixed) before final straining.

We also used a double-boiler to melt and purify the wax.  We now have about 2 pounds of pure beeswax.  (No picture currently available.)  There are still fine bits of wax in the honey.  We eat it this way.  But, before we give it to others, we have been using 4 layers of cheesecloth as a final straining.

Thursday, August 1, 2013

First inspection with two boxes on each hive, part 2.

Fourth inspection of Hive A and Hive B, Sunday, 6/16/13:
[Note:  This is follow-up to the July 7, 2013 post, with video links below.]

To recap, this was day 43 for the hives, with the packages having been installed Saturday the 4th of May, 2013.  We were able to do a full inspection today, as the weather was in the mid-70's.  The inspection started at about 1820.  There were two boxes on each hive, and I felt a bit more rushed for time.  But, overall it went well.  Inspection ended at 1850.

The videos (part 1 and part 2) tell most of the tale.  It was fun to see the bees moving into their second box and drawing out more comb.  With how much wax they were making (and how little syrup they were taking in), they were clearly finding a great deal of nectar in the wild.

Monday, June 10, 2013

Hives busy this afternoon... Swarming? Hot?

First, I'll load in a panorama shot of the hives in their prairie with the backdrop of the forest.  If you click on the image, it should load up a larger view.  It is wide enough that you may have to scroll it sideways or otherwise manipulate the image, depending on your computer or device.

Click to enlarge this panorama view of the hives (roughly center of pic).

Here is a YouTube video of the mite count (first half of the clip) and my attempt to re-set the entrance reducer without getting stung (second half).

As we approached the hives this afternoon for a visual-only inspection, we saw a visitor....

Ground squirrel.

I don't think that the squirrel family of animals eats hives or honey, so I'm going to assume the little fella had no evil intentions.

Back to the hives, we saw that the hives were busier than we are used to seeing.  More bees were on the outside of the hive, and many were flying in front of the hives.  It has been quite warm and humid, so my hope is that this activity is normal and not indicative of a problem, and absconding, or a swarm.

One thought is that the colony is old enough that some of the newer bees may be starting to forage.  If this is the case, they may be making orientation flights; after all, this might be the first time that they've been out of the hive.  The movement in front of the hive seemed to look like orientation flights to me, but I'm certainly no expert.

I could also see that Hive B's entrance reducer had somehow been knocked out of place and deeper into the hive.

Entrance reducer has been knocked out of place.

I'm interested in why the entrance reducer was out of place.  I have read that the bees's activity can move the entrance reducer.  However, this is usually in the form of pushing the entrance reducer further out.  It seems to me that this was pushed in.  Perhaps a skunk?  A mouse?  I may need to set up my trail camera in this area to see what is happening during the night and while we aren't at the hives.

I wanted to look inside the hives, but this may need to wait until later in the week.  I am hoping that I won't find an intruder in Hive B.

Wednesday, June 5, 2013

Kenyan top-bar hive.

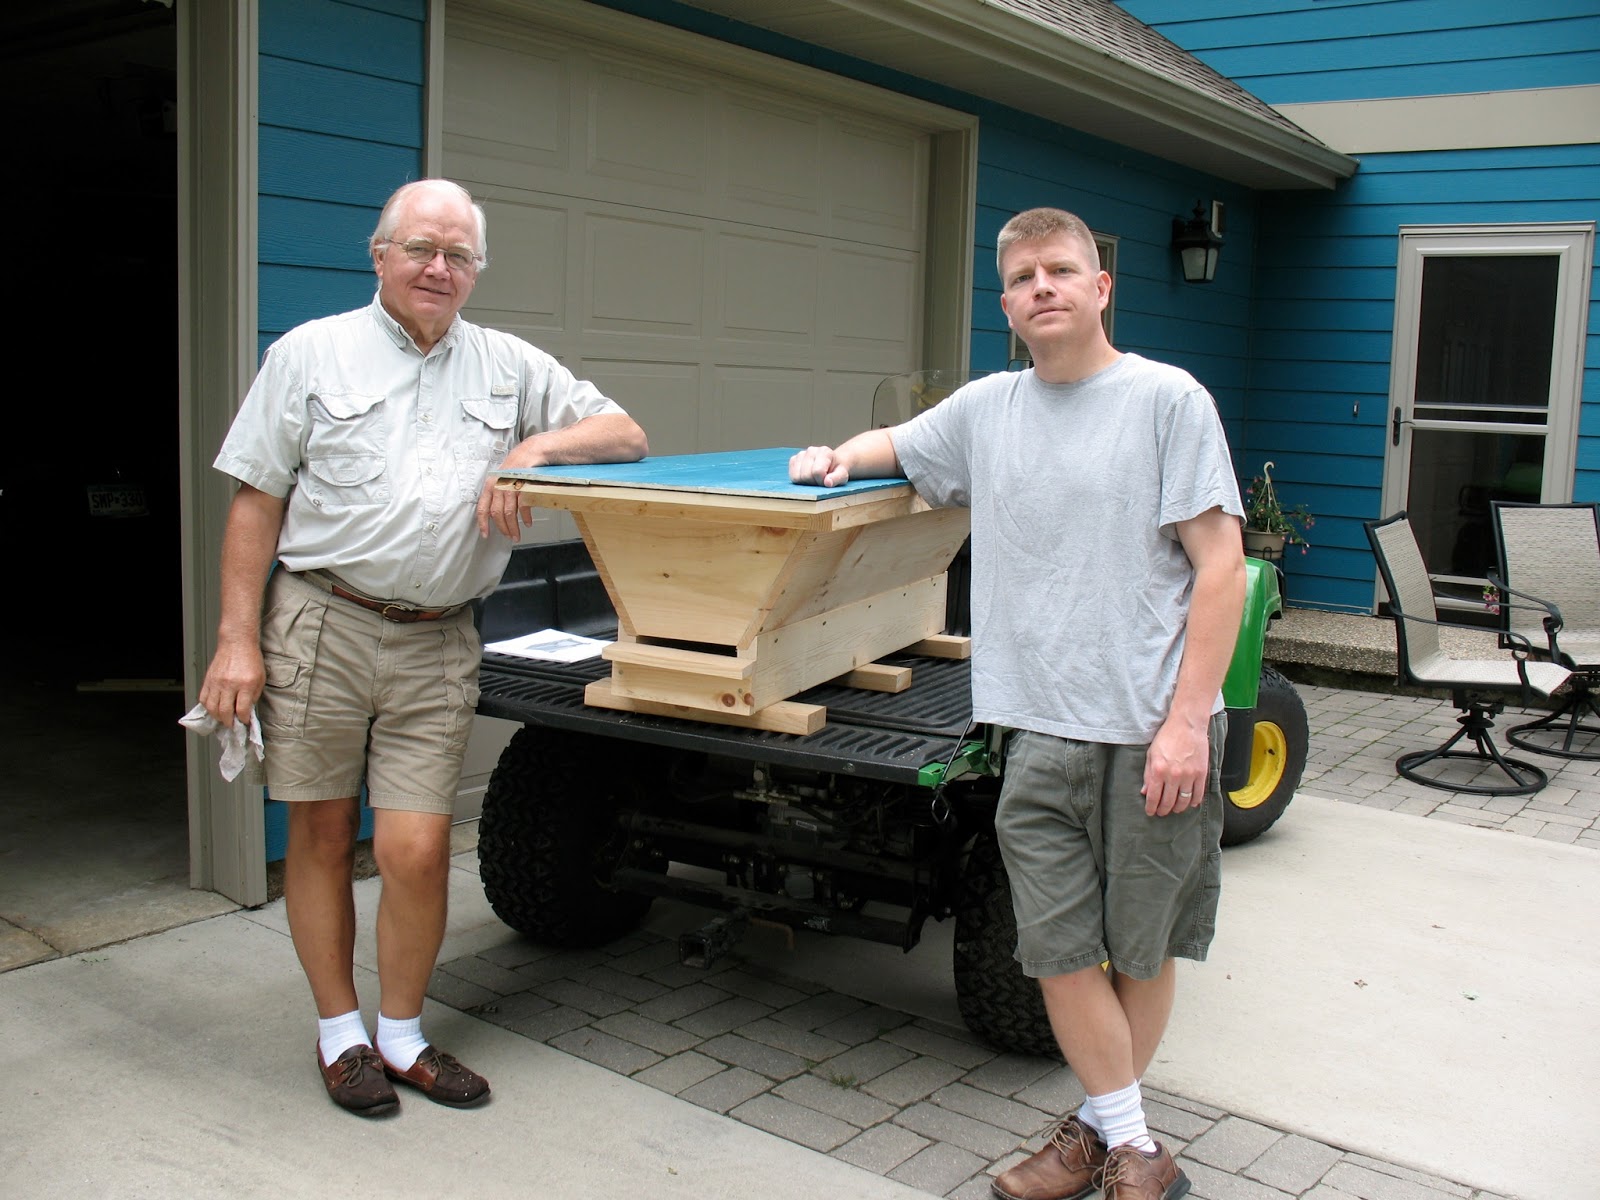
A few summers ago, my dad and I made a Kenyan top-bar hive.

Kenyan top-bar hive carpenters and their finished product.

It is meant to emulate a hollowed-out log hive with bars across the top, presumably used in Kenya and the surrounding areas.

Front-ish view.

Side view.

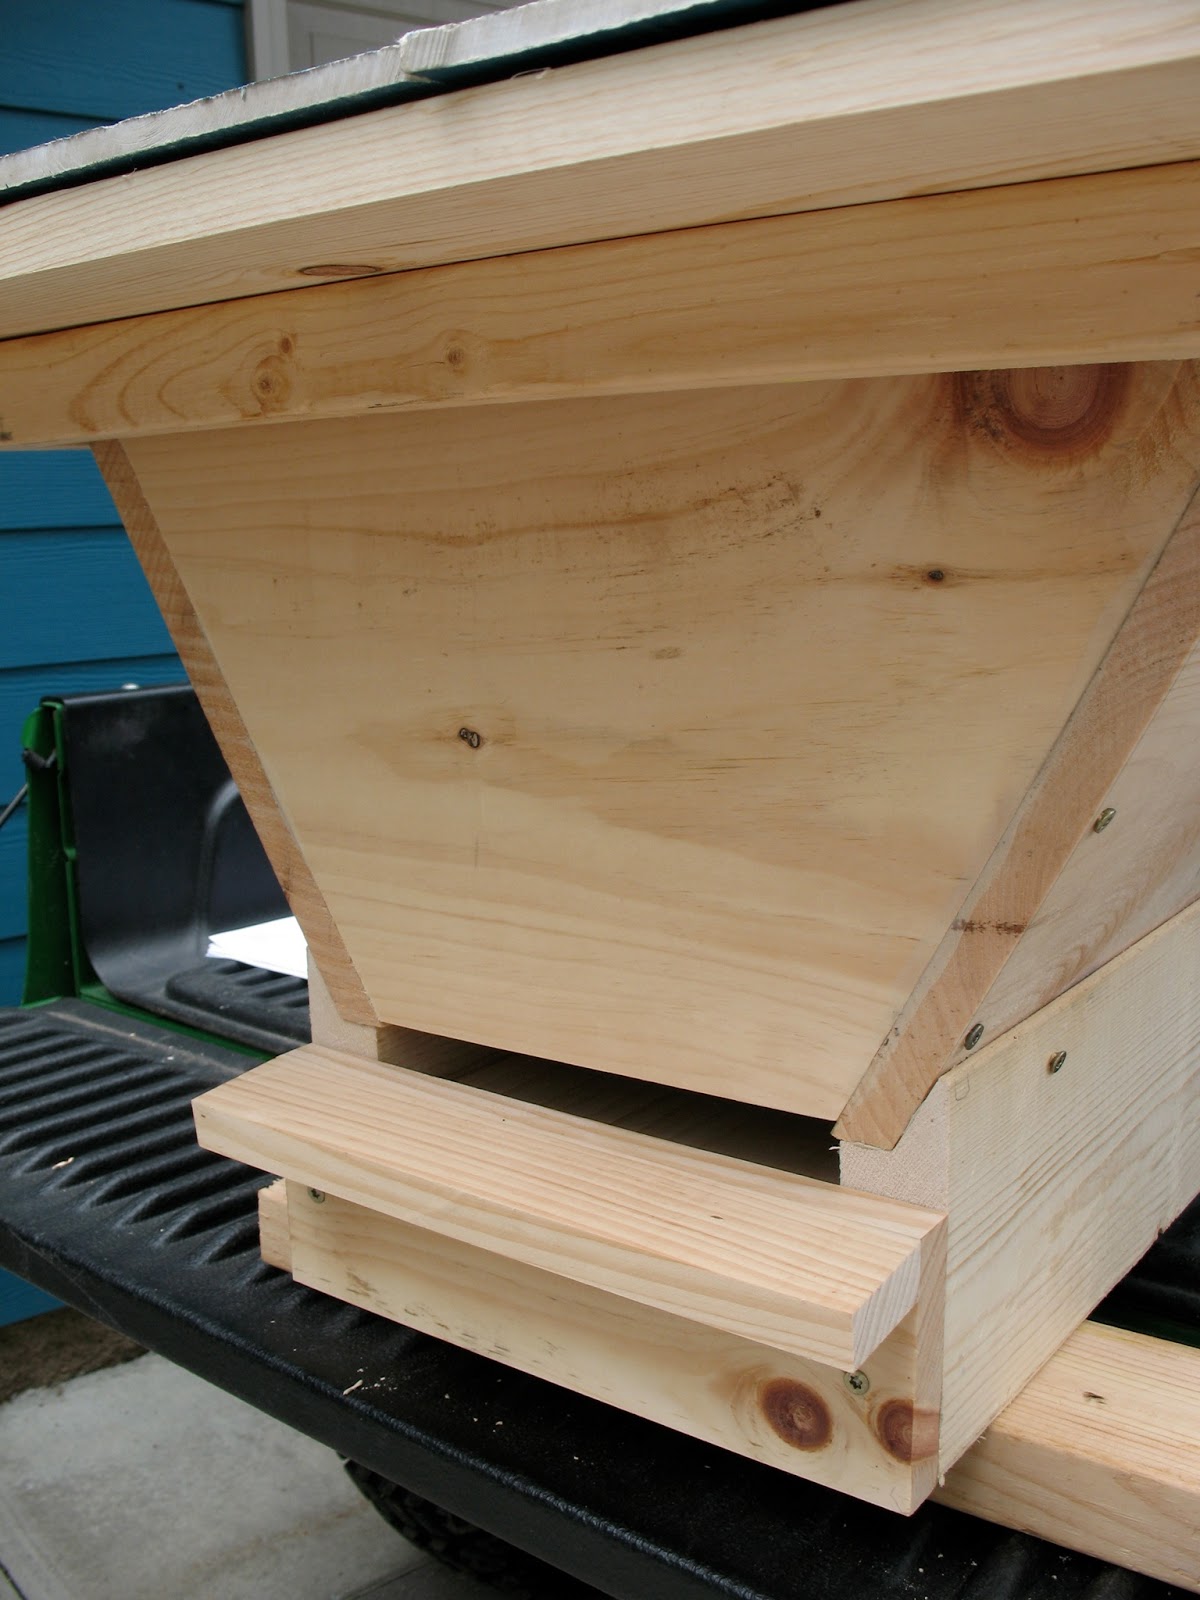
A closer view of the entrance and the landing board.

I entered into the Nicollet County Fair last summer and received a blue ribbon and a $2 - $3 prize.  I was so drenched in fame and fortune that I could no longer appear in public.  However, that's a story for another post...

A view of the underside of the top cover. 

The cover is off, and you can see the top surface of
the cover.  That the cover surface is suspiciously like
the house's siding is purely coincidental, of course.

The following two pictures show the hive with the top cover (the blue-colored cover) off.  You can see four of the bars standing upright.  This shows you the underside of the bars.  A thin wood strip is embedded into the bottom of the bars.  The goal is that these will prompt the bees to build comb on each bar's underside there and there only.

You can also see into the hive itself.  The large, empty cavity will be eventually filled with parallel strips of comb growing down from the bars arranged across the top.


Below was my attempt to put the camera into the hive and take a picture of the underside of the bars.  This is what the bees would "see" from within the hive.  They would ideally see the rows of low points and build comb down from each wooden strip.

A view from inside the hive, looking up at the top bars.

In case the pictures are difficult to interpret, the main part of the hive is like a large, trapezoidal, feeding or watering trough.  This shape keeps the bees from attaching comb to the sides of the hive.  The bars are placed across the top.  They fit together with no gap between the bars.  On the underside of the bars, a thin strip of wood was glued in.  Think of a popsicle stick, but larger and a bit thicker.  The idea with this "starter strip" is that the bees will use these to guide their comb production.  Hence, the comb will be nicely parallel and allow me to inspect the hive without destroying "cross comb" pieces.

I haven't yet put bees into it, as I heard that bees cannot over-winter in MN in a top-bar hive.  However, another blog that I follow (http://topbarbeesmn.blogspot.com) and blogs mentioned by the author give me hope that I might be able to get bees to survive the winter in the Kenyan top-bar hive.

My plan now is to place it out in the prairie next spring.  If my two current hives survive the winter, they may be likely to swarm next spring/summer.  If I can either catch a swarm to install it into the Kenyan top-bar hive or bait a swarm into it, I can get going with that hive.

Solitary bee house.

My dad and I made this several years ago.

Solitary bee house in the prairie.

It was probably in '06 or '07.  I don't have the original plans, but I believe it was from a DNR publication.  If I can get the plans again, I'll post them.

Basically, it is a formation of three 2 x 6 boards, cut square at the bottom and angled at the top (to accommodate the roof).  The roof was made of, I believe, 1 x 8 boards.  I then tacked some spare shingles to the top.

We placed it in the middle of our prairie restoration project in the summer of '08.  As far as I could tell, it remained empty during the first year or two.  However, it slowly appeared to fill up with clay-capped cells.  I assume that these are solitary bee cells, but I don't know for certain.

Same solitary bee house years later, now in use.

Close-up of cells.  Beneath the grass are clay/mud caps of, likely, solitary bee cells.

Thursday, May 2, 2013

Bees arrive 5/4/2013.

The bees are coming to MN from CA, and they are expected to arrive today (Friday, May 3rd, 2013).  I could get them later today, but will probably wait until Saturday's scheduled pick-up time.

I have a video on YouTube that is, basically, an introduction to my hive and its components.  Clicking here should bring you to that video.

Something that I don't make clear in the video...  The depth of the "boxes" of the hive can be deep, medium, or shallow.  Many beekeepers use deeps for the brood-nest area.  In MN, to survive the winter, the bees ought to have three deep brood-nest boxes to themselves.  Above these, many beekeepers will use shallow boxes as the supers, the boxes that go above the bees's brood-nest from which the beekeeper can collect honey not needed by the hive.

I've decided to use medium boxes for everything.  The bees will need five of the mediums to about equal three deeps.  My supers will also be medium boxes.

I decided to do this so that all of my frames will be interchangeable (and the boxes, too).  If a hive needs extra honey for the winter, for example, I could take frames from the super and exchange them with frames from the brood-nest.

I hope to video tape the installation of the two packages of bees and to post it shortly after 5/4/2013.

Thursday, April 25, 2013

Beehives are ready.

Here is a brief video showing some of the landscape surrounding the beehives.  The trees mark the start of a forest that has several deep ravines.  Many of the ravines start on our prairie.


Later in the day, I was able to drag a photographer out to the site to get a picture of me with my handiwork.  The photographer was too modest to allow her own picture to be taken amongst the glorious, burgeoning apiary.

Beekeeper flanked by "Hive A" and "Hive B."

The beehives are in the prairie.

This afternoon, I cleared and roughly leveled some land in our prairie.  The two beehives will have trees to the North and the West.  This will break the winter wind nicely.  They will have good sun for most of the day, including early morning sun.  The early sun will warm the hive so that the bees will be more likely to start foraging earlier in the day.

Starting to clear the old prairie grasses.

Over the cleared land, I placed overlapping layers of landscaping fabric.  On that, I placed the patio/paver stones.  They are 24" x 24" stones.

Partway through the back-breaking project.

After the 14 stones were in place, I trimmed back the excess landscaping fabric.  The end result is below.  They are fairly level.  You couldn't roller skate across the things, but it is good enough for government work.  And, it should be good enough for the bees.

Final layout of the fourteen 24" x 24" patio/paver stones.

My thoughts on using the pattern above:  (1) I could have both hives on the same platform.  This saved on stones as I didn't need to make two completely separate areas; (2) The extra stones in the front would keep more of the bees's flight path clear of the grasses.  The grasses on our prairie routinely grow to 6+ feet.

Beehives are in place and ready for the bees that are coming ~5/1/2013.

Saturday, April 20, 2013

The hives arrive.

On April 1, 2013, my pallet of beekeeping materials arrived.  Commandeering our van, I picked them up that week.  It was like Christmas in April for me.

At the beekeeping course (see previous post), it became clear that I wanted to label all the woodenware that I would be using.  Some diseases that bees get can be transferred by intermixing the hive parts.  Also, some of the hive inspections that I would be doing in the coming months and years involve rotating the order of the hive boxes.  So, I wanted to number them.  Over time, the numbers would be out of order in any given hive, but I would still be able to track my "hive reversals."

Box A-1 and its 10 labelled frames.

The frames should be--depending on the source one reads--rotated out every 3 - 5 or 5 - 10 years.  That is, the old frame with the comb attached to it should be removed and not used again.  The wax could be collected and used in candle-making or other activities, I suppose.  The old frames and comb and foundation should be replaced with new.  So, my labeling system has the hive letter, then the frame number, and finally the last two numbers of the year that I started using them.  All the frames that end in "-13" will be rotated out in the years 2018 through 2023.

The inner covers of boxes A and B, and a box of frames beneath them.

The inner covers shouldn't need to be rotated out as I don't think that they will get old or concentrate any pesticides or toxins like the wax of the comb might.  But, I still wanted to keep track of which hive they are covering.

Hive with just one box on it.

Above, you can see one hive.  It only has one box on it.  If you haven't seen a Langstroth Hive before, it can be a bit complicated.  Mine, above, has a black plastic stand.  Starting at the top is a telescoping outer cover (it is the "lid" with painted white wood on the bottom 2/3rds and the metal covering on the upper 1/3rd).  The large, painted box is one of the medium hive bodies.  It has handles on all four sides.  You can see the front handle.  It is the recessed part of the large panel that is facing the camera.  The parts below the hive body include an entrance reducer, a screened bottom board, and a regular bottom board.

Assembled hives, each is four boxes high.

The hive on the left in the photo above is facing away from the camera.  I need to block up that opening in the back, as the bees won't be able to use it.  And, I don't want any mice or other animals setting up residence.  The hive on the right in the photo is facing toward the camera.  You can see the small hole in the from near the bottom.  This is the "entrance reducer" set on the smallest opening.  When I first install the bees, the hive will only be one box high.  The number of bees will be relatively small (5 - 7 thousand bees), and they (1) don't need a large opening and (2) won't be able to defend a large opening.  As the season progresses, I can steadily open up the entrance reducer to allow for larger openings.

The two hives, both facing camera now, and labelled.  Still four boxes high.

Above, the hives are labelled and assembled again.  The holes in the front are drilled to 1" diameter.  There will be corks in them at various times.  They serve as additional ways into the hive when the hive is growing and strong.  They will also allow for a winter opening (as the bottom entry will be all but closed, and it will also have a mouse guard on it).

As of today (4/20/13), the ETA for my two packages of bees is May 1, 2013.  There is still snow on the ground today and it is quite cold (low 30's, Fahrenheit).  Some people are getting their bees today in the Midwest.  I'm interested to see how their installations go...