Monday, June 10, 2013

Hives busy this afternoon... Swarming? Hot?

First, I'll load in a panorama shot of the hives in their prairie with the backdrop of the forest.  If you click on the image, it should load up a larger view.  It is wide enough that you may have to scroll it sideways or otherwise manipulate the image, depending on your computer or device.

Click to enlarge this panorama view of the hives (roughly center of pic).

Here is a YouTube video of the mite count (first half of the clip) and my attempt to re-set the entrance reducer without getting stung (second half).

As we approached the hives this afternoon for a visual-only inspection, we saw a visitor....

Ground squirrel.

I don't think that the squirrel family of animals eats hives or honey, so I'm going to assume the little fella had no evil intentions.

Back to the hives, we saw that the hives were busier than we are used to seeing.  More bees were on the outside of the hive, and many were flying in front of the hives.  It has been quite warm and humid, so my hope is that this activity is normal and not indicative of a problem, and absconding, or a swarm.

One thought is that the colony is old enough that some of the newer bees may be starting to forage.  If this is the case, they may be making orientation flights; after all, this might be the first time that they've been out of the hive.  The movement in front of the hive seemed to look like orientation flights to me, but I'm certainly no expert.

I could also see that Hive B's entrance reducer had somehow been knocked out of place and deeper into the hive.

Entrance reducer has been knocked out of place.

I'm interested in why the entrance reducer was out of place.  I have read that the bees's activity can move the entrance reducer.  However, this is usually in the form of pushing the entrance reducer further out.  It seems to me that this was pushed in.  Perhaps a skunk?  A mouse?  I may need to set up my trail camera in this area to see what is happening during the night and while we aren't at the hives.

I wanted to look inside the hives, but this may need to wait until later in the week.  I am hoping that I won't find an intruder in Hive B.

Varroa mite counting, round 2.

On June 4, 2013, I placed freshly-Vaselined sticky boards back under the screened bottoms. Please see this link for a refresher on screened bottom boards. This link will take you to the June 2nd post on Varroa mite counting.

Today, June 10, 2013, I removed the sticky boards to do my 2nd varroa mite count.  Hive A had only one mite, and Hive B had five.  If I use the bee population estimates from my 6/2/13 post:
  • Hive A:  Across 6.3 days,* 1 mite per 6,250 bees = 0.03 mites per 1,000 bees per day.
  • Hive B:  Across 6.3 days, 5 mites per 6,875 bees = 0.12 mites per 1,000 bees per day.
I would note that Hive B does seem to have a higher mite load than Hive A.  So, perhaps the numbers seen in the June 2nd post are correct, despite my fears that the sticky board method I used might have led to error.

In any event, the mite load of each hive appears to be very low.  So, I will continue to monitor the mites.  I won't do any treatment yet.

* = Sticky boards were placed at 0630 on 6/4 and removed at 1445 on 6/10.

Hive A's sticky board.

On these two pictures of the sticky boards, you can see the normal droppings of a hive.  The lines on the board of yellowish material represents pollen, wax bits, and other particles that drop from bees and comb during day-to-day functioning.  The refuse falls in lines, for that is where the bee space is between the frames of drawn comb.

Hive B's sticky board.

Somewhere, a bee is walking in left-ward or right-ward
circles, depending upon which leg this is...

Next in the plan for mite counting is to do another sticky board count but try do a simultaneous powdered sugar roll count.  I'll describe that in a future post.

Friday, June 7, 2013

Trailer(s) for "More Than Honey" recently released.

A movie entitled More Than Honey is set to be released on June 12, 2013. The synopsis for this movie follows:

"Oscar-nominated director Markus Imhoof (THE BOAT IS FULL) tackles the vexing issue of why bees, worldwide, are facing extinction. With the tenacity of a man out to solve a world-class mystery, he investigates this global phenomenon from California to Switzerland, China and Australia. Exquisite macro-photography of the bees (reminiscent of MICROCOSMOS), in flight and in their hives, reveals a fascinating and complex world in crisis."

Click this link to see the official site.  This link points to the trailer.  I'm not sure how permanent each link will be.

As far as I know, there are two trailers.  One I can access on my iPhone's "Trailers" app.  The other is linked to above.  The trailers show off a lot of in-hive footage.  There are bees in flight, emerging from cells, communicating, etc.  There is footage of bees in flight.  One of the trailers even--somehow--had footage of a drone mating with a queen.  There is footage of a Varroa mite on a bee.

Wednesday, June 5, 2013

Kenyan top-bar hive.

A few summers ago, my dad and I made a Kenyan top-bar hive.

Kenyan top-bar hive carpenters and their finished product.

It is meant to emulate a hollowed-out log hive with bars across the top, presumably used in Kenya and the surrounding areas.

Front-ish view.

Side view.

A closer view of the entrance and the landing board.

I entered into the Nicollet County Fair last summer and received a blue ribbon and a $2 - $3 prize.  I was so drenched in fame and fortune that I could no longer appear in public.  However, that's a story for another post...

A view of the underside of the top cover. 

The cover is off, and you can see the top surface of
the cover.  That the cover surface is suspiciously like
the house's siding is purely coincidental, of course.

The following two pictures show the hive with the top cover (the blue-colored cover) off.  You can see four of the bars standing upright.  This shows you the underside of the bars.  A thin wood strip is embedded into the bottom of the bars.  The goal is that these will prompt the bees to build comb on each bar's underside there and there only.

You can also see into the hive itself.  The large, empty cavity will be eventually filled with parallel strips of comb growing down from the bars arranged across the top.


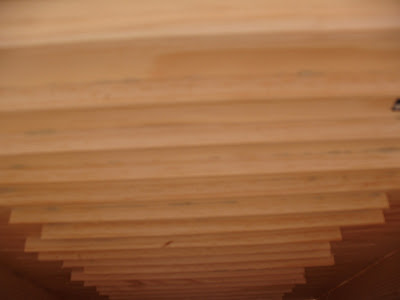
Below was my attempt to put the camera into the hive and take a picture of the underside of the bars.  This is what the bees would "see" from within the hive.  They would ideally see the rows of low points and build comb down from each wooden strip.

A view from inside the hive, looking up at the top bars.

In case the pictures are difficult to interpret, the main part of the hive is like a large, trapezoidal, feeding or watering trough.  This shape keeps the bees from attaching comb to the sides of the hive.  The bars are placed across the top.  They fit together with no gap between the bars.  On the underside of the bars, a thin strip of wood was glued in.  Think of a popsicle stick, but larger and a bit thicker.  The idea with this "starter strip" is that the bees will use these to guide their comb production.  Hence, the comb will be nicely parallel and allow me to inspect the hive without destroying "cross comb" pieces.

I haven't yet put bees into it, as I heard that bees cannot over-winter in MN in a top-bar hive.  However, another blog that I follow (http://topbarbeesmn.blogspot.com) and blogs mentioned by the author give me hope that I might be able to get bees to survive the winter in the Kenyan top-bar hive.

My plan now is to place it out in the prairie next spring.  If my two current hives survive the winter, they may be likely to swarm next spring/summer.  If I can either catch a swarm to install it into the Kenyan top-bar hive or bait a swarm into it, I can get going with that hive.

Solitary bee house.

My dad and I made this several years ago.

Solitary bee house in the prairie.

It was probably in '06 or '07.  I don't have the original plans, but I believe it was from a DNR publication.  If I can get the plans again, I'll post them.

Basically, it is a formation of three 2 x 6 boards, cut square at the bottom and angled at the top (to accommodate the roof).  The roof was made of, I believe, 1 x 8 boards.  I then tacked some spare shingles to the top.

We placed it in the middle of our prairie restoration project in the summer of '08.  As far as I could tell, it remained empty during the first year or two.  However, it slowly appeared to fill up with clay-capped cells.  I assume that these are solitary bee cells, but I don't know for certain.

Same solitary bee house years later, now in use.

Close-up of cells.  Beneath the grass are clay/mud caps of, likely, solitary bee cells.

Sunday, June 2, 2013

Varroa mite counting.

In a post from June 1, 2013, I discuss the Varroa mite and its impact on bees.  This evening (June 2, 2013), I collected the sticky boards that I placed under the hives on Friday, May 31, 2013.  If you'd like to skip right to the YouTube video, it is here.

Since the boards were placed at 1030 on 5/31/13 and retrieved at 1820 on 6/2/13, they were under the hives for 2 days, 7 hours, and 50 minutes.  This is about 2.3 days.  Most sites that describe how to count mites use the 24-hour drop number as the standard.  So, the number of mites that I would count would need to be divided by 2.3 to give me my daily, 24-hour, drop rate.

You may recall that Hive A had a sticky board with Vaseline around the periphery only.  My thinking was that the mites would eventually reach an edge in their effort to get back to the hive to re-attach to a bee.  In their wandering, they would come to the Vaseline and stick.  I think this was sound reasoning.  However, as I was walking back to the house with the sticky board, I realized the potential problem.  The wind may have gusted any mites not yet stuck to Vaseline right off the board.  For the future, I will coat the whole board with Vaseline.  Live and learn, I guess...

In the end, Hive A's sticky board had only one mite.  Although the hive may just be quite low on mites and healthy, it could be that there were more that just blew off into the prairie.  Hive B's sticky board (the one with Vaseline over the whole surface) had 6 mites.  I attempted to take a photo of a mite.  I think that I need a different lens for the camera.  Below, you can see my attempt to take the picture with the camera's auto-focus looking through a magnifying glass with a light source coming in from the side.  I probably confused the heck out of the camera.

Counting mites.

Close-up view.  Mite is the reddish-brown thing in center of magnifying glass field.

There are many methods for counting mites and using that number to estimate the hive's "mite load."  It seems that--by any of them--both Hive A and Hive B are currently in the clear.  Here are two examples of how to decide whether to treat the mites or continue to monitor.

Using an absolute number of mites dropped per day:
Some methods simply use a total daily mite count to decide whether to treat the hive or not.  Some sites recommend treating the hive for mites if the daily mite drop is 5 - 10 mites.  Others say that you can wait until reaching 40 mites per day.

If I assume a worst-case scenario and say that each hive had 6 mites dropped in 2.3 days, that becomes a daily mite drop of about 2.6 mites.  This seems to be well below the threshold number at which I would consider treatment.

However, the hive size is not taken into account.  In one day, 20 mites falling off a small hive of only 10,000 bees is a lot different than 20 mites falling off a huge hive of 70,000 bees.  My hives are currently small, so perhaps 2.6 mites per day is a problem...?

Using the drop rate and trying to estimate the number of bees to get mites dropped per bee per day:
I found a site that claims that a medium frame (which I am using) full of bees on both sides has 1,250 bees.  If I look at my inspection checklist from the May 29, 2013 inspection, I see that Hive A had four full frames of bees and two half-full frames of bees.  Hive B had 4 full frames of bees and about three half-full frames of bees.

Bees in Hive A:
  • (full frames x 1,250) + (half-full frames x 625)
  • (4 x 1,250) + (2 x 625) = 6,250 bees*
Bees in Hive B:
  • (4 x 1,250) + (3 x 625) = 6,875 bees*
Continuing with this method, the next advice is, "If your sticky board count shows more than 2 mites per thousand bees per day in mid-August or more than 4 mites per thousand bees per day in September, you should find a way to reduce the mite population." It doesn't say what to be worried about in June.

In any event, 2.6 mites per about 6,500 bees per day is less than one-half mite per thousand bees per day. I feel fine with not treating at this time. However, I will--probably tomorrow night--put the sticky boards back down to get another count.

* = These estimates make sense to me, and make me feel confident in the results. The packages of bees that I installed on May 4, 2013 each had about 7,000 bees in it. Allowing for some death of the older bees, but with the newly-born bees not yet replacing the population, having about 6,500 bees in each hive sounds about right. Recall that some may have been out foraging during the last inspection, too, so there may be more than 6,500 in each hive. But, again, it seems to be a very good estimate.

Saturday, June 1, 2013

Screened bottom boards.

During the third inspection, I installed screened bottom boards in each hive.  This is part of IPM or "Integrated Pest Management."  I'll describe each in this post.  In this post, I describe the next step that I take to monitor for bee pests.  If you'd like to just skip to the video, click here.  There will be another link at the end of this post.

First, a standard bottom board (non-screened) is little more than a piece of sturdy wood with edges around three of the four sides.  It is the bottom-most part of the hive.  These edges hold up the rest of the hive, and they also allow a space for the bees to crawl across at the bottom of the hive after they enter.  I don't have a picture of my own bottom boards, but here is a good image of one.  The picture is attributed to this address.

A hive's bottom board.

Above, painted white is a bottom board.  The raised edges that you can see along the back and on the left and right edges hold up the hive bodies that are above it.  The gap in the front, where the bottom board lacks an edge or ridge, will make a wide hole through which bees enter and exit the hive.  The wood "stick" that you can see is the entrance reducer.  That is used to make the opening smaller during certain seasons or when the hive population is too low to need or be able to defend the larger opening.

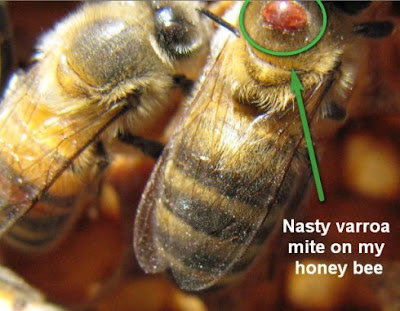
Almost all honeybees have to contend with the Varroa destructor mite.  The image below is attributed to this address.

A tick is to a human as a mite is to a honeybee.

The following picture is not one of mine.  Its attribution is here.  But, it shows nicely how the mite attaches to a bee.

The mite is attached to a honeybee's thorax.

In daily living and grooming, these mites will occasionally fall off the bees.  If you are using a standard bottom board, the mites will land on that.  They don't die from the fall.  They will crawl around on the surface of the bottom board until a bee goes past them that they can grab onto in order to parasitize.

If, however, you use a screened bottom board (picture attributed to this site)...

A screened bottom board.

...a portion of the mites will fall through the screen.  It will be hard for them to travel the distance needed to get back to the area of the bees and re-attach to one of them.

Moreover, if you have a layer of plastic underneath the screen and it is covered with something sticky or oily, the mites will be trapped.  This will help in two ways:  (1) The mites cannot get back onto a bee to suck their hemolymph and eventually reproduce, and (2) The mites can be counted to monitor the infestation level of the hive.

In this video, I install a sticky board under each screened bottom board under each hive.  Hive A gets one with an insert under the screen that is covered with Vaseline only along the periphery.  Hive B gets one with an insert that is fully covered with Vaseline.

Mead update, and round 2 (batches 4 - 6).

I brought a sample of the cinnamon mead to my local brew and wine store.  It is Brew-n-Wine of Mankato, MN.  Don Kaiser has been helpful during my last couple of visits.  So, they (Don Kaiser and Gordon Stevens) tried the mead and pronounced it to be (likely) non-fatal and non-blinding.  It was, indeed, mead.  However, it was too acid and too sour.  The good news was that it didn't taste as if it had any contaminants or bacteria.

The sourness reminded Don a bit of bread and we wondered whether the thing to blame was the simple recipe that I had used for batches 1 - 3 and the bread yeast for which it called.  Perhaps if I used a yeast that was meant more for wine, the batches would taste better.  So, we found a champagne yeast that is often used in mead-making.

I decided to keep things simpler this time.  I would make one batch of dry mead (meaning that it starts with less honey, possibly even only enough for the yeast to use to create the needed alcohol).  Another batch would be full or sweeter mead (there would be honey in excess of what the yeast needed to reach the % alcohol that would kill themselves).  The third batch, just for fun, would be an apple wine.  It was little more than apple juice (preservative free), some sugar, and then the yeast.

In summary, the main difference would be that I was using a more select yeast and that I would be adding tannin (instead of using raisins to provide this as in batches 1 - 3).  Before adding the yeast, each batch would be pre-treated with campden tablets.  Briefly put, this would kill off any yeast, bacteria, or other organisms already present in the batch.  After the campden tablet did its duty, I could safely add my champagne yeast with the knowledge that it would be the only living thing in the batch and would be allowed to work its magic unfettered by contaminants.

The fact that I would be using part of the laundry room cupboards to brew more wonderful alcoholic creations brought tears--I assume of joy--to Kim's eyes.

Three new batches of mead (well, one is apple wine).

A Minnesota Solitary Bee, the "Metallic Green Bee."

On my way to the beehives this afternoon, I spotted what I thought of, in general, as a "solitary bee."  I believe that this is a metallic green bee.  That seems to be a general name for a dozen or so bees that fit that overall description.  From the range, description, size, and the like, I believe that this particular metallic green bee is Agapostemon virescens.

Click to enlarge.

Click to enlarge.

I deemed that this nasty creature was stealing precious nectar and pollen that should have been going to my honeybees.  So, shortly after these photos were taken, I crushed the metallic green bee that you see above.*

I also saw many bumblebees, but haven't yet snapped a good photo of them.

* = I am, of course, joking.  The non-native honeybee and the native bees generally live in harmony together.  They tend to not displace or harm one another.  The metallic green bee above was left alone to do his/her business.