Showing posts with label installation. Show all posts

Saturday, April 20, 2019

2019-04-20: Hiving two packages of bees.

I had a couple of years with no bees.  First, I did not find out that they had died over the winter a couple of years ago until it was too late to order new bees.  Then, it sort of slipped my mind last spring.

So, this year, I ordered two packages from my usual supplier, Nature's Nectar.  I had one package each of Carniolan Honeybees and Italian Honeybees.  I did not really care which bees I got, but I usually do not get two of the same subspecies.

This was the first year that my packages were plastic.  I like the old wood and metal screen ones better, since I can see the bees easier.  I also would learn that it was easier to spray the bees with sugar water through the metal screen compared to the plastic packaging.

It was about a two-hour drive home, but the weather was mild; the bees probably did not get too hot.

I picked up the bees at 0915, but they suggest that you do not hive them until the evening.  So, they sat in the cool garage for most of the day.  I sprayed them with sugar water once to feed, calm, and cool them.

Finally, 1800 arrived, and we were ready to hive the bees.


I have the two packages of bees, and I'm wearing my bee suit.  If you watch other people's videos, they often don't wear a bee suit.  The reason is that the bees do not have a hive to protect, so they tend to be more docile.


Here I am with my helper, Vaughn.  I'm having some difficulty uploading the videos, so I'll outline the steps that we did:
  1. The syrup-soaked bees will be "poured" into the center of the bottom (and--at this time--only) hive body, so we removed the center four or so frames.
  2. Plug the entrance with the entrance reducer on the smallest setting and block that temporarily with a wad of prairie grass.
  3. Soak the bees well with syrup from the spray bottle.
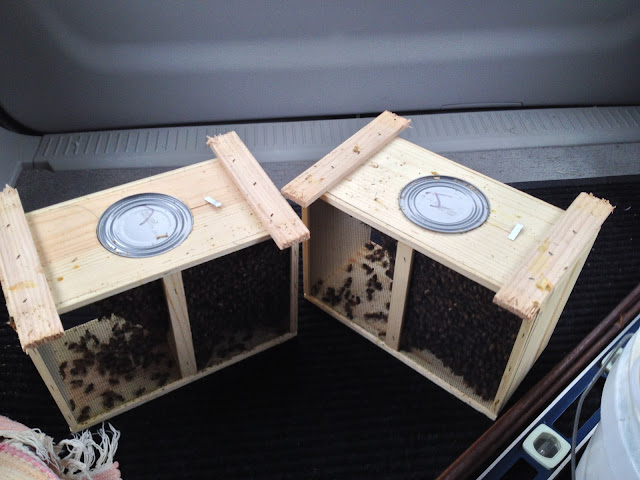
  4. Use the hive tools to pry the metal can from the package.  (This is the syrup the bees ate during their trip from CA to MN and then from Stillwater to me.)
  5. Once the can is out, spray the bees some more.
  6. Remove the queen's cage (she is transported separately) and set it aside.
  7. Knock the bees to the bottom of their package by striking the package against the ground.
  8. Pour the syrup-soaked bees into the hive.
  9. Leave the mostly-empty package near the entrance so the bees can eventually get into there (the bees will probably push the grass out of the hole over the evening).
  10. Take the wood cork out of the queen's cage, and replace it with a mini-marshmallow.
  11. Put a pollen patty on the top of the frames for the bees to eat until they can bring in a good supply of pollen from plants.
  12. Put on the inner cover (the board with an oblong hole in it).
  13. Put the feeder pail over that hole so that the bees can feed from that until they are able to bring in nectar from flowers.
  14. Put an empty hive body over the pail.
  15. Put the outer cover over the empty hive body.
The next step, which we will probably do tomorrow, is to check the queen's cage.  Ideally, the marshmallow will have been eaten by the bees so that the queen can exit the cage and start laying eggs.

Sunday, April 10, 2016

Hiving Two Packages of Bees on April 10, 2016

I have photos and videos yet to be posted.  Hiving the Carniolan Honeybees and the Italian Honeybees went well.  They each seem to be taking to their new home.

Tuesday, April 5, 2016

Preparing for the 2016 beekeeping season.

It's been a while since I posted here.  Last year, I put out the top-bar hive (Hive Beta) and installed bees into it.  I also cleaned and put new bees into my two Langstroth hives (Hive A and Hive B).  They all seemed to do well, but I ended up combining medium hive bodies from Hive B to Hive A so that Hive A would survive the winter.  Hive Beta seemed to be behind, and I think it was due to me not much feeding syrup to them and the bees truly starting from scratch--an empty hive with no foundation or wax at all.

We put a thermometer into Hive A, and we could see that the bees were alive as recently as late-January of 2016.  In fact, on one day, the hive was in the high-90's when the ambient temperature in the area was well below freezing.

I have yet to check Hive A or Hive Beta.  I don't think that either survived, but I haven't had a chance to crack either of them open.  I did put straw bales around them this year, and that is a first for me.

Going forward, I'm going to move to deep hive bodies.  I only need to use three of them instead of the five mediums that I have been using.  They will be heavier, but easier to and track.

I just got word that the bees are coming Sunday, April 10, 2016.  I tried a guy who is closer than the place I was using in Stillwater, so we'll see how pick-up goes.

I need to get the hive bodies ready.  They are assembled, but I have to drill the holes, get the corks, prime them, and paint them.  I also have to assemble at least 20 frames for the deeps.

Tuesday, May 7, 2013

Installing packages of bees, x 2.

On Saturday, May 4, 2013, we installed two packages of bees into the hives.  To begin, we drove to Stillwater, MN.  This is the bee distribution point for my supplier.  He is very busy when the bees come.  They apparently come from CA to him, by the hundreds of packages.  You are given a time slot to arrive, based on last name.  It's all quite efficient.  Drive in, tell him your name, get the bees, and drive out.  The bees rode back to the apiary-to-be in the back of my parents's vehicle.  As they warmed up in the vehicle (they were being stored outside in about mid-40-degree weather), they became more active and noisy.

The two packages of bees.  The top of their feeder can is visible.  The bees are clustered on the right side of the packages, surrounding the queen that is in her own, smaller cage.

The two packages of bees are in the heated garage.

Since it was so cold, I had brought the empty hives into the heated garage the day before.  With the hives then warmed in the garage, I put the bees (still in their packages) into the hives.  This meant that I needed to remove the center 4 frames.  We walked the hives out to the site with the bees inside them.  I placed the hives on their stands.  Then, starting with Hive A, we installed the bees.

In our bee suits.  The beekeeper garb is warm enough that we are in shorts and t-shirts underneath, though the weather is in the mid-40's, temperature-wise.

For the installation of the packages into the hives, we had about 1/2-dozen hecklers (on-lookers and well-wishers, they called themselves).  The Carniolan queen package went into Hive A, and the Italian queen package, Hive B.  To my relatively untrained eye, they were very similar.  The Carniolan queen was darker in color, especially in the abdomen.

The installations went well overall, as far as I can tell.  As noted above, the temperature was in the mid-40's.  It was a mostly cloudy day.  Not too windy, especially where the hives are located (they have windbreaking trees to the North and the West).

Some of my on-lookers had suffered through hive installation videos on YouTube, per my request.  So, I had some help there.  Also, I had written up a "cheat sheet" beforehand that I gave to another.  I could request a prompt on the next step, as neeeded.

Hive A was first.  It was going to receive the Carniolan queen.  I won't bore you with the step-by-step.  There are videos linked to below.  We used the marshmallow method for the queen release.  The rest of the installation you can view via YouTube as Part 1 and Part 2.  The only thing that I did clearly wrong was failing to remove the queen and her cage from the larger cage before shaking the bees into Hive B.  Despite the vigorous jostling, she seemed to be fine.  The rest of the installation was the same with each hive and largely textbook.

Saturday, May 4, 2013

It's a girl!

Thousands of them, actually. The bee packages are in the back of the vehicle, and we are driving from the bee dealership back to home.

This is just a brief, mobile post. Hopefully, more information will follow in a later entry.

Monday, April 22, 2013

April 21, 2013: 30-some degrees and people were hiving bees!

The place from which I ordered my bees (see previous post) had a shipment arrive yesterday.  It was very snowy here in MN.  School was closed Thursday and Friday.  A lot of snow remained on the ground by Sunday even.  But, when the bees come, it's time to throw them into the hive.  I wonder how it went with them...